With the current public health concerns, we’re aware that many events are forced to cancel, reschedule, or convert to a virtual race. If this is the case for your event, I want to make sure you know how to use the cancellation/postponement feature within RunSignup. It’s a pretty quick process, but there are a few important steps, which I will outline here. I encourage you to reach out to me or another member of the Competitive Timing team if you have any questions or need assistance.
Step 1: Set up cancellation/postponement options
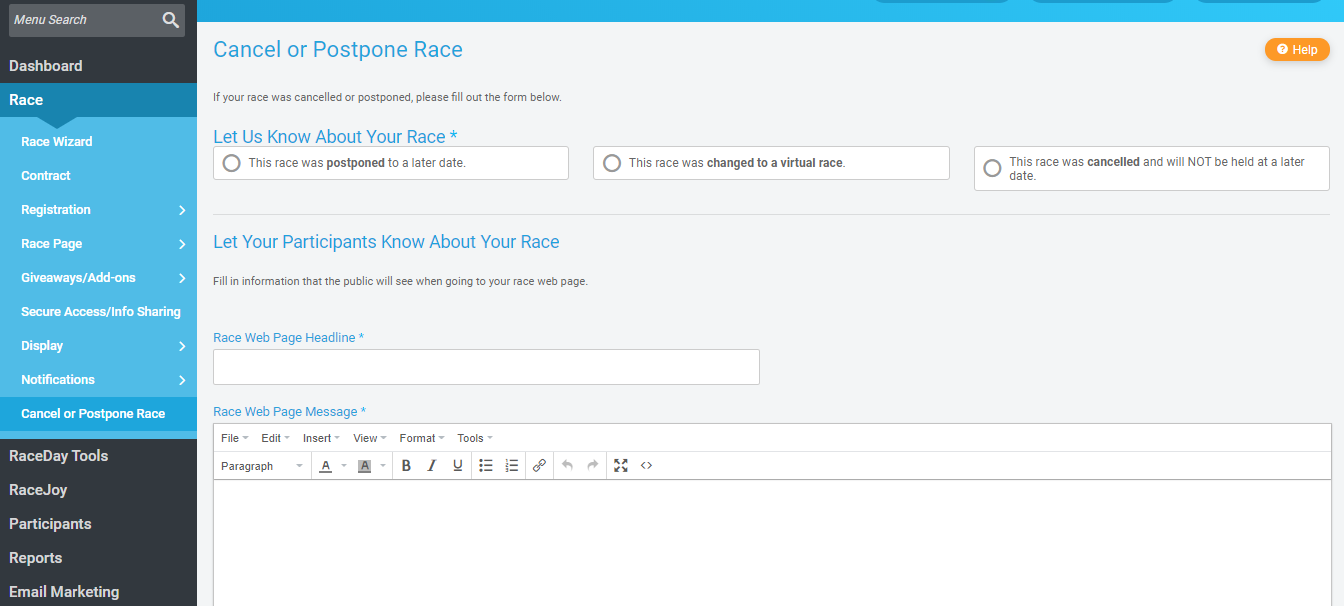
Under the Race menu, select “Cancel or Postpone Race”, then click on “Set Up Postponement or Cancellation”. You will then see the following screen, which gives you options to postpone or cancel the race. It also gives you the option to communicate to participants that you have converted to a virtual race (more on that later).

As you scroll down, you will also be able to tailor the options you will be giving to participants. You can check any of these that you like, and it will give participants the option to select a box for the option they prefer. If you only have one option (eg. automatic deferral to next year, no refunds available, or transfer registration to the new race date) do not check any of the boxes, and you can explain how registrations will be handled in the “Race Web Page Message” box.
It is important to note that the options the participants select will not be automatically applied. Any refunds requested, etc. will still have to be issued manually. There is a bulk refund tool that can help with this, and you can let us know if you need assistance utilizing that.
If you have decided to postpone your race, but have not decided on a new race date, you can simply put “To Be Announced” or something to that effect, in the date field. If this is the case you can either leave registration open or choose to temporarily block registration by moving on to step 2.
Be sure to click “Save Changes” at the bottom before moving on to the next step.
Step 2: Set up “Registration Closed” message
The first step here is to make sure people cannot currently register for the race. This is not only a good tool for cancellations, but also for postponements for which a new date has not been set.
The easiest way to do this is to allow registration through the Private Expo Mode only, which nobody will have access to without a password. That way, you don’t have to edit all your registration dates, so when you renew the race for next year, you will have less work to do.
From the “Race Day Tools” menu, select “Race Day Registration”, then “Expo Mode”, and click the box that says “Enable Private Expo Mode”. Then set a password in each of the two boxes. This password is somewhat irrelevant, since it won’t actually be used.

After clicking “Save Changes”, click on the “Registration Closed Settings” link.
Step 3: Registration Closed Message
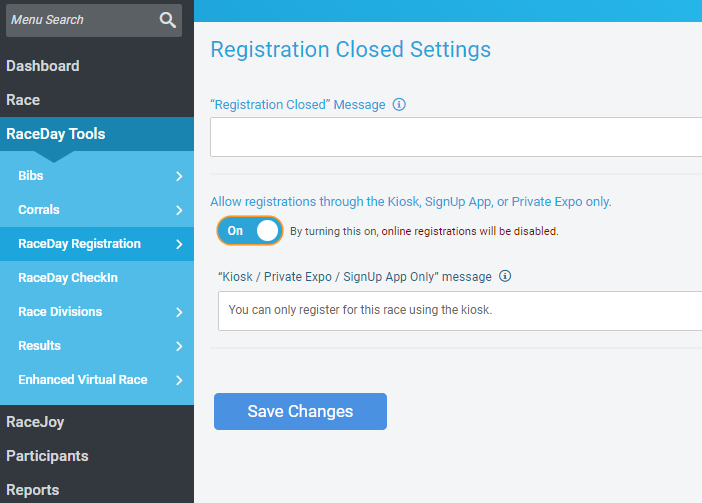
You will now find yourself at the following screen, where you will want to select “Allow registrations though the Kiosk, SignUp App, or Private Expo only.”

The last step is to create a message that the public will see if they try to go to the registration site. Explain the circumstances and how you plan to proceed. This message should be pasted into both the “Registration Closed Message” box and the “Kiosk / Private Expo / SignUp App Only message” box.
Click “Save Changes” one more time, and that takes care of the most important steps.
A note on Virtual Races
Converting your race to a virtual race is one way to still maintain presence and branding, but without actually having a mass event. It requires participants to complete the course within a specified date range and self-report their times. If you have more questions regarding virtual races or how to set them up, please contact us and we are happy to help you determine if this is a good option for your event.
Thanks as always for working with Competitive Timing, and we look forward to coming out the other end of this unfortunate circumstance stronger than ever!

